
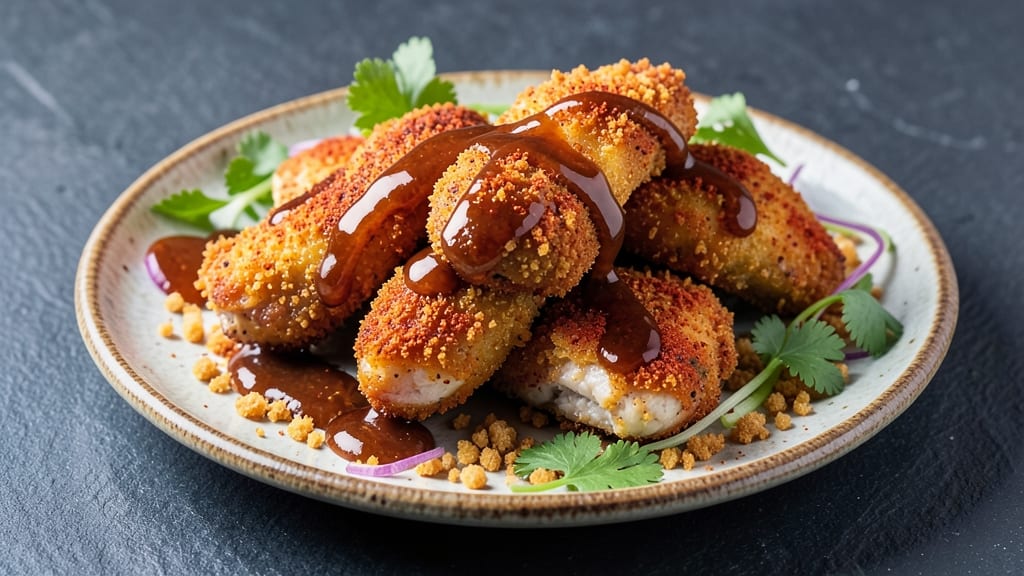
This baked Nashville hot chicken tenders recipe delivers the legendary crispy-tender perfection of Nashville hot chicken—without deep-frying a single drop of oil. 🔥 The secret lies in a double breading of crushed tortilla chips and panko, creating a shatteringly crispy exterior that locks in juicy, spicy chicken inside.
I perfected this method after years of experimenting with air fryer and oven techniques, and it never fails to impress—even spice lovers who usually shy away from baked versions.
The spicy cumin cream sauce is what truly elevates these tenders, cutting through the heat with its velvety tang while keeping the dish restaurant-quality.
Unlike traditional fried versions, this method uses oven-baked chicken thighs for maximum tenderness, then coats them in a Nashville hot seasoning blend—paprika, cayenne, garlic powder, and a touch of brown sugar—that creates that signature sweet-spicy crust.
The tortilla chip crunch adds an extra layer of texture that makes these tenders impossible to resist.
By the time these tenders emerge from the oven, you’ll have golden, crackling breading that shatters at every bite, revealing juicy chicken drenched in that spicy, creamy sauce.
The balance of heat, crunch, and richness is exactly what makes Nashville hot chicken legendary—but now, you get it all without the mess of deep-frying. Serve with ranch for cooling down between bites, or drizzle extra sauce over the top for maximum indulgence.
This recipe is designed for foolproof crispiness and tender chicken every time, whether you’re feeding a crowd or treating yourself to a spicy snack. The best part? Leftovers reheat beautifully, making it perfect for meal prep or game day. Let’s get cooking—your taste buds (and your oven) will thank you.
Ingredients for baked nashville hot chicken tenders
Crispy chicken, spicy sauce, and a tortilla crunch that’ll have everyone begging for more.
| Ingredient | Amount | Notes |
|---|---|---|
| Boneless, Skinless Chicken Thighs 🍗 | 1 ½ lb | Cut into 1-inch strips |
| Tortilla Chips 🌯 | 2 cups | Crushed into fine crumbs |
| Japanese Panko Breadcrumbs 🍞 | 1 cup | For extra crispiness |
| Large Eggs 🥚 | 2 whole | Beaten for egg wash |
| All-Purpose Flour 🌾 | ½ cup | For dredging |
| Sweet Paprika 🌶️ | 2 tbsp | Key for color and flavor |
| Ground Cumin 🌿 | 1 tbsp | Earthy base for sauce |
| Cayenne Pepper 🔥 | 1 tsp | Adjust for heat preference |
| Garlic Powder 🧄 | 1 tbsp | For depth of flavor |
| Brown Sugar 🍯 | 1 tbsp | Balances spice |
| Salt 🧂 | 1 tsp | Diamond Crystal preferred |
| Black Pepper 🌶️ | ½ tsp | Freshly ground |
| Heavy Cream 🥛 | 1 cup | Full-fat for richness |
| Butter 🧈 | 2 tbsp | Unsalted, melted |
| Lemon Juice 🍋 | 1 tbsp | Brightens the sauce |
| Olive Oil 🫒 | 2 tbsp | For crispy coating |
The chicken thighs are the foundation—skinless but not boneless (trust me, the meat stays juicier). Grab Costco’s family-sized pack if you’re feeding a crowd, or grab pre-cut thighs from the deli counter to save time. For the tortilla chips, Fritos or Doritos work best—they crush into fine, sturdy crumbs. Panko is non-negotiable here; Japanese-style gives that perfect shatter. If you’re short on time, toast the panko in the oven for 5 minutes before mixing—it adds insane crunch. The thighs should be pounded to even thickness (about 1/4-inch) so they cook uniformly.
No tortilla chips? Crushed corn chips or even potato chips (like Lay’s) work in a pinch—just make sure they’re crushed fine. Running low on cumin? Smoked paprika at half the amount adds depth, but the cumin’s earthiness is what ties the sauce together. For the sauce, heavy cream is key—don’t skimp on the full-fat version. If you’re avoiding dairy, coconut cream works but the texture won’t be identical. The butter should be melted but not hot when mixing into the sauce—just warm enough to blend smoothly. Lemon juice? Fresh is best, but bottled works if you’re in a bind.
Prep the chicken and sauce ahead—they’ll keep 2 days in the fridge, separated. For maximum crispiness, bake the tenders straight from the fridge (no thawing needed). The sauce reheats beautifully—just warm it gently on the stove. Store leftovers in airtight containers with parchment between layers to keep them crisp. These reheat best in the oven at 375°F for 10 minutes—microwaving turns them soggy. Freeze for up to 3 months by portioning into single servings with sauce on top (it’ll freeze solid but thaw beautifully).
Why You’ll Love This Recipe
- No-Fuss Crunch: I swear by the tortilla chip crumbs in the coating—it’s the secret weapon for that addictive, shatter-crisp texture without deep-frying. Honestly, the panko just adds fluff, but the chips? That’s where the magic happens.
- Spicy Comfort in 20: Between us, these tenders hit the spot when I’m craving Nashville heat but don’t want to deal with grease splatter. The baked method keeps it clean, and the thighs stay juicy—no sad, dry bites here.
- Game for Any Night: I’ve served these as a snack with ranch, a main with waffles, or even stuffed in tacos. The beauty? They’re just as happy reheated as they are fresh, so they’re my go-to for lazy nights or game day.
- Budget Win: Chicken thighs stretch farther than breasts, and tortilla chips are cheap—this recipe feeds four for under $10. Plus, leftovers reheat like a dream, so I’m always stocking up before my freezer runs low.
Step-by-step instructions for baked Nashville hot chicken tenders
Here’s how to make restaurant-style tenders with perfect crispiness and bold spicy-sweet flavor.
👨🍳 Step 1: Prep the Chicken and Spice Rub
Cut the 1.5 lb boneless, skinless chicken thighs into 1-inch strips—even thickness ensures even cooking. In a large bowl, combine the 2 tbsp sweet paprika, 1 tbsp ground cumin, 1 tsp cayenne pepper, 1 tbsp garlic powder, 1 tbsp brown sugar, 1 tsp salt, and ½ tsp black pepper. Toss the chicken strips in this spice blend until every piece is fully coated.
Let the seasoned chicken rest for 15 minutes at room temperature. This step is crucial—it ensures even cooking and maximum flavor penetration. While you wait, crush the 2 cups tortilla chips into fine crumbs using a food processor or by placing them in a resealable bag and crushing with a rolling pin.
🍳 Step 2: Build the Crispy Coating
In a shallow dish, whisk together the 2 whole large eggs until frothy. In another dish, combine the ½ cup all-purpose flour with the crushed tortilla chip crumbs and 1 cup Japanese panko breadcrumbs. This triple-coating system (flour, chips, panko) creates that signature Nashville crunch.
Working in batches, dredge each chicken strip first in the flour mixture, then dip into the beaten eggs, and finally press into the tortilla-panko crumb blend. Press firmly to ensure the coating sticks—this is what makes them crispy. Place the coated tenders on a wire rack set over a baking sheet to prevent sticking.
🔥 Step 3: Bake to Golden Perfection
Preheat your oven to 425°F and line a large baking sheet with parchment paper. Arrange the coated tenders in a single layer, leaving ½ inch between each piece for even air circulation. Bake for 18-20 minutes, flipping halfway through, until they’re deep golden brown and the internal temperature reaches 165°F.
Don’t skip the flip—this ensures even browning and crispiness on both sides. If they brown too quickly, tent with foil for the last 5 minutes to prevent burning. The tortilla chips should be shatteringly crisp, not soggy.
🥘 Step 4: Make the Spicy Cumin Cream Sauce
While the tenders bake, melt the 2 tbsp butter in a saucepan over medium heat. Add the 1 cup heavy cream and bring to a gentle simmer. Stir in the 1 tbsp lemon juice and let it reduce slightly for 3-4 minutes until the sauce thickens just enough to coat the back of a spoon.
This sauce should be velvety smooth with a subtle tang from the lemon. Taste and adjust seasoning with a pinch of salt or extra cayenne if you want more heat. Keep it warm until ready to serve—it’ll thicken further as it cools.
🍽️ Step 5: Assemble and Serve
Transfer the baked tenders to a serving platter and immediately drizzle with the warm spicy cumin cream sauce. The contrast of crispy, spicy tenders with the cool, creamy sauce is what makes this dish irresistible. Garnish with extra crushed tortilla chips for that authentic Nashville touch.
Serve immediately with your favorite dipping sauces—extra sauce on the side, pickles, or a cooling ranch. The tenders should be juicy inside with a crisp, spicy crust that shatters with every bite. Leftovers? Reheat in a 350°F oven for 10 minutes to restore crispiness.
Pro Tips For Making Baked Nashville Hot Chicken Tenders
- Bake in Two Stages: Start with a screaming-hot oven (425°F) for 10 minutes to get that crispy crust, then drop to 375°F for the last 15 minutes. I learned this the hard way—burning the coating before the chicken was done. The second stage cooks through without turning your tenders into hockey pucks.
- Crush Those Chips Fine: Pulse tortilla chips in a food processor until they’re powder-fine—no bigger than coarse sand. I used to just crumble them by hand, and the coating ended up lumpy and uneven. This gives you that perfect, fine crunch Nashville-style crust without the mess of extra flour.
- Double-Dip the Egg Wash: Run each breaded tender through the egg wash twice—first before the panko, then again after pressing it on. Sounds weird, but it works: the second dip seals the coating so it doesn’t fall off when you pull them out of the oven. (Yes, even if you’re impatient like me.)
- Pat Those Thighs Dry: Wrap the chicken thighs in paper towels and press hard for a full minute before seasoning. Moisture is the enemy of a crispy crust, and I was skeptical until I tried it—now my tenders stay golden and crunchy instead of soggy. Skip this, and you’re fighting an uphill battle.
Make-ahead tips for this baked nashville hot chicken tenders
Prep Ahead
Season the chicken and crush the tortilla chips 1 day ahead—store them in separate airtight containers in the fridge. The spices will meld beautifully overnight, and the chips stay crisp when stored properly.
I like to portion the sauce ingredients too, so I just need to melt and mix when ready to bake. 💫
Marinate Overnight
For extra tenderness, marinate the chicken strips in the spice blend for 4-6 hours (or overnight) before breading. Place them in a resealable bag, seal tightly, and refrigerate. This step infuses the meat with deep flavor and ensures juicy results even when baking. Just pat dry before coating.
Sauce Prep
Make the sauce base 2 days ahead—combine all ingredients except butter in a jar, seal, and refrigerate. When ready to use, simply melt the butter and stir. The sauce keeps well and reheats beautifully. I often double the batch because it disappears fast with these tenders!
Bake from Cold
For maximum crispiness, bake the coated tenders straight from the fridge. Arrange them on a parchment-lined tray and bake as directed. The cold start helps create that perfect shatter—no need to thaw! Just add 2-3 extra minutes to the baking time if coming from refrigerated.
Freezer-Friendly
Assemble the fully breaded tenders on a tray, freeze solid for 1 hour, then transfer to a freezer bag. Bake straight from frozen, adding 5-7 extra minutes to the cooking time.
The sauce can also be frozen—just thaw and reheat gently before serving. Label bags with the date for easy tracking.
Game Day Hack
Prep everything except baking the tenders morning of the game. Store components in separate containers and assemble right before the oven goes in. This way, you can focus on the big event while still serving up restaurant-quality food.
Just remember to let the chicken rest at room temp for 15 minutes before baking! ⚡
Nutrition facts
Frequently asked questions
Can I use chicken breasts instead of thighs for these tenders?
Chicken breasts will work, but thighs are ideal because they stay juicier during baking. If using breasts, pound them to an even ½-inch thickness and bake for 12-15 minutes instead. The thinner cut can dry out faster, so keep an eye on them. For best results, marinate the breasts overnight in the spice blend.
How do I adjust the heat level in the sauce?
The sauce starts with 1 tsp cayenne, but you can easily adjust it. For mild heat, reduce to ½ tsp or swap for smoked paprika. For extra spice, add ½ tsp cayenne per serving or a pinch of red pepper flakes. Taste before serving—you can always add more heat, but you can’t remove it!
Why are my tenders soggy instead of crispy?
Soggy tenders usually happen from steam buildup or undercooked breading. First, ensure your oven is fully preheated to 425°F—this creates the hot, dry air needed for crispiness. Place tenders on a wire rack (not directly on the pan) and leave ½ inch between pieces. If they brown too fast, tent with foil for the last 5 minutes to finish cooking without burning.
Can I make this recipe in an air fryer?
Preheat the air fryer to 375°F and cook in batches for 10-12 minutes, shaking halfway. The air fryer works even better for crispiness because it circulates hot air more efficiently. Just reduce the baking time by 3-5 minutes and watch closely to avoid overcooking. The sauce and serving instructions stay the same!
What’s the best way to serve these tenders?
Serve with cooling accompaniments to balance the heat: classic ranch, pickles, or even a simple cucumber salad. For extra Nashville flair, add dill pickle slices on top of the tenders—they cut through the spice perfectly. Pair with cornbread or mashed potatoes for a full meal. Leftovers reheat best in a 350°F oven for 10 minutes to restore crispiness.