
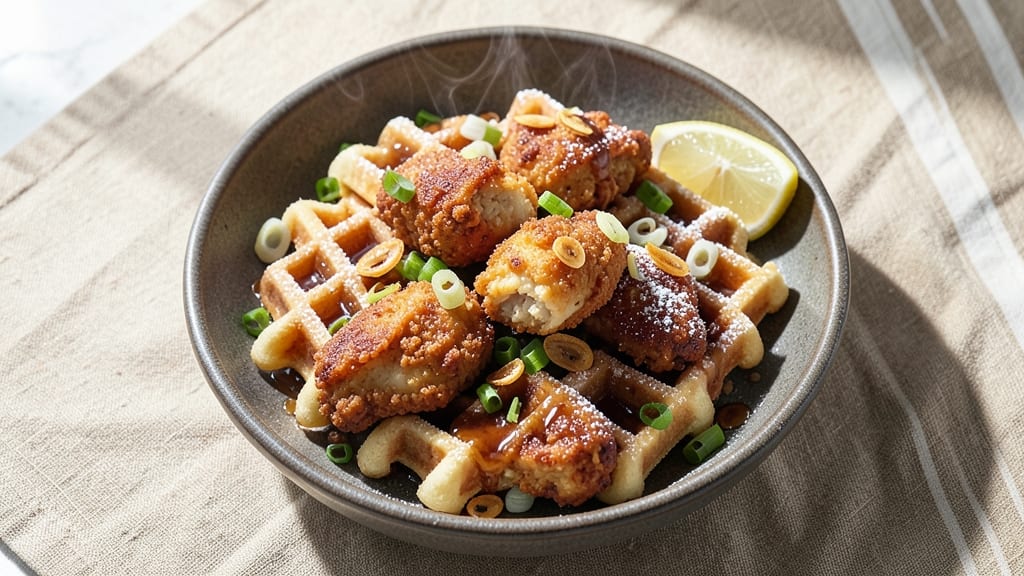
This oven fried chicken and waffles recipe delivers crispy, golden chicken with a tender waffle base—all without deep-frying. I perfected this technique after years of testing crispiness methods, and the result is a breakfast masterpiece that rivals Southern diners.
The secret lies in the oven-frying method, which creates that coveted crunch while keeping the process simpler and cleaner than traditional frying.
The beauty of this recipe is its balance: crispy chicken with a perfectly golden crust sits atop fluffy waffles, all topped with warm maple syrup.
I use a simple buttermilk batter for the chicken that stays light yet locks in moisture, while the waffle batter includes a touch of baking powder for that signature airy texture. This method ensures every bite delivers that satisfying contrast between crispy, tender, and sweet.
What makes this dish truly special is how it transforms a weekend breakfast into an unforgettable meal. The chicken stays juicy despite its crispy exterior, and the waffles maintain their structure even when stacked.
Serve with extra syrup, fresh berries, or a dollop of whipped cream for the full Southern experience. The best part? You can prepare components ahead and assemble just before serving.
Perfect for brunch gatherings or a decadent weekend treat, this recipe proves you don’t need deep-frying to achieve restaurant-quality results. The oven method delivers the same crispy perfection with less mess and more control. Let’s create this showstopping dish that’ll have everyone asking for seconds.
Ingredients for oven fried chicken and waffles
Crispy chicken and fluffy waffles—all baked to golden perfection without deep-frying mess.
| Ingredient | Amount | Notes |
|---|---|---|
| Chicken Breast 🍗 | 1 ½ lb | Boneless, skinless, cut into 1-inch pieces |
| All-Purpose Flour 🌾 | 1 cup | For buttermilk batter |
| Buttermilk 🥛 | 1 cup | Full-fat for best flavor |
| Large Eggs 🥚 | 1 whole | Room temperature |
| Baking Powder 🍞 | 1 tbsp | Aluminum-free preferred |
| Salt 🧂 | 1 tsp | Kosher or sea salt |
| Black Pepper 🌶️ | ½ tsp | Freshly ground |
| Garlic Powder 🧄 | 1 tsp | Not garlic salt |
| Paprika 🌶️ | 1 tbsp | Smoked for extra flavor |
| Vegetable Oil 🫒 | ½ cup | High smoke point |
| All-Purpose Flour 🌾 | 2 cups | For waffle batter |
| Granulated Sugar 🍚 | ½ cup | White or light brown |
| Baking Powder 🍞 | 2 tsp | Same brand as above |
| Salt 🧂 | ½ tsp | Same as above |
| Large Eggs 🥚 | 2 whole | Room temperature |
| Milk 🥛 | 1 ½ cups | Whole milk preferred |
| Pure Maple Syrup 🍁 | ½ cup | Grade B for deeper flavor |
| Unsalted Butter 🧈 | 2 tbsp | Melted for serving |
The chicken pieces are key—1-inch chunks ensure even cooking and maximum crispiness. Boneless, skinless breasts stay tender while achieving that coveted crunch. I always grab mine from Whole Foods or the butcher counter at Kroger—look for plump, uniform pieces. The buttermilk batter needs to rest 30 minutes for maximum flavor development, so plan ahead. For extra crunch, I add a sprinkle of cornstarch to the flour before dredging the chicken.
No buttermilk? Mix 1 cup milk with 1 tbsp vinegar or lemon juice and let sit 5 minutes. The waffles get their structure from aluminum-free baking powder—Bob’s Red Mill is my go-to brand. For a richer waffle, swap half the milk for heavy cream. The maple syrup should be Grade B if you can find it—it’s darker and more robust. If you’re short on time, pre-made waffle mix works in a pinch (just add extra egg for moisture), though homemade always tastes better.
Chicken batter keeps 24 hours in the fridge—just stir before using. Waffle batter can be prepped a day ahead and stored in an airtight container. The chicken comes out best when baked fresh, but you can re-crisp in the oven at 400°F for 5-7 minutes if needed. Leftovers? Store components separately—the chicken reheats beautifully, while waffles are best eaten fresh. For a crowd, double the waffle batter and bake in batches.
Why You’ll Love This Recipe
- Weeknight Hero: I swear by this combo when I’m too tired for deep-frying—just coat the chicken in buttermilk and flour, bake it crispy, and boom. No oil splatter, no waiting for the stovetop to cool, just golden perfection with zero fuss.
- Crispy-Creamy Magic: The buttermilk marinade tenderizes the chicken while the baking powder in the waffles gives them that light, fluffy lift. That first bite? Crunchy exterior, juicy center, and a waffle soaking up every last bit—it’s like a hug in food form.
- Breakfast for Dinner: Honestly, this is my go-to for lazy Sundays or when friends drop by unexpectedly. Serve it with maple syrup and hot sauce, and suddenly you’ve got a full spread that feels fancy but took less time than ordering takeout.
- Budget-Friendly Feast: Chicken breast and pantry staples like flour and baking powder stretch this recipe far—double the batch, reheat the leftovers, and you’ve got lunch covered too. Plus, the waffles freeze like a dream if you’re not ready to eat them all at once.
Step-by-step instructions for crispy oven fried chicken and waffles
Here’s how to achieve restaurant-quality results with perfectly crispy chicken and golden waffles.
Prepare the Buttermilk Batter for Chicken
In a large bowl, whisk together the 1 cup buttermilk, 1 whole large egg, 1 tablespoon baking powder, 1 teaspoon salt, ½ teaspoon black pepper, 1 teaspoon garlic powder, and 1 tablespoon paprika until fully combined. The batter should be smooth with no visible lumps. This mixture creates the signature crispy coating while keeping the chicken juicy inside.
Cut the 1.5 lb chicken breast into 1-inch pieces and gently submerge them in the batter, pressing lightly to ensure even coating. Let the coated chicken pieces rest for 10 minutes at room temperature. This resting period allows the batter to adhere better and ensures even cooking. Don’t skip this step—it makes all the difference in achieving that perfect crispy exterior.
Bake the Crispy Chicken
Preheat your oven to 425°F and line a baking sheet with parchment paper. Arrange the battered chicken pieces in a single layer on the prepared sheet, spacing them about 1 inch apart to allow for even browning. This spacing prevents steaming, which is crucial for achieving that signature crispy texture.
Bake for 20-25 minutes, flipping the chicken halfway through cooking at the 12-minute mark. You’ll know it’s done when the chicken reaches an internal temperature of 165°F and the coating is a deep golden brown. The edges should be crispy while the meat remains tender and juicy. If you notice any pieces browning too quickly, tent the baking sheet loosely with foil to prevent over-browning.
Make the Waffle Batter
In a separate large bowl, whisk together the 2 cups all-purpose flour, ½ cup granulated sugar, 2 teaspoons baking powder, and ½ teaspoon salt. In another bowl, beat the 2 whole large eggs and 1.5 cups milk until well combined. Gradually pour the wet ingredients into the dry ingredients while gently stirring just until combined. Fold in the ½ cup pure maple syrup until the batter is smooth and lump-free.
Let the waffle batter rest for 10 minutes at room temperature. This resting period allows the flour to fully hydrate and the gluten to relax, resulting in lighter, crispier waffles. The batter should be thick but pourable—if it’s too thick, add 1 tablespoon milk to reach the right consistency. Preheat your waffle iron to medium-high heat and lightly grease with non-stick cooking spray or a thin layer of vegetable oil to prevent sticking.
Cook the Waffles to Golden Perfection
Pour about ½ cup of waffle batter onto the preheated waffle iron, spreading it evenly to the edges. Cook until the waffles are golden brown and crispy on the outside, with steam rising from the iron—this usually takes about 3-4 minutes. Use a thin spatula to carefully remove the waffle and transfer it to a wire rack to keep it crisp.
Repeat with the remaining batter, adding a fresh batch to the iron as each waffle finishes cooking. The key to perfect waffles is maintaining consistent heat and not overcrowding the iron. If the waffles brown too quickly on the outside but remain doughy inside, reduce the heat slightly for the next batch. The waffles should be crisp enough to hold their shape when stacked, with a slight give in the center.
Assemble and Serve
Melt the 2 tablespoons unsalted butter in a small saucepan over low heat. Once melted, pour the butter over the hot waffles and let it soak in for 30 seconds. This step adds an extra layer of richness and helps create that classic waffle-butter flavor.
To serve, place 2 waffles on each plate and top with 2-3 pieces of crispy chicken. The contrast of the warm, buttery waffles with the crispy, savory chicken is what makes this dish so irresistible. Serve immediately while everything is hot and crispy—this dish doesn’t wait well, and the flavors are at their peak when enjoyed right away.
Pro Tips For Making Oven Fried Chicken And Waffles
- Pound Chicken Flat: Skip the thick cuts—chicken breast is stubborn. Use a meat mallet or rolling pin to flatten each piece to ¼-inch thickness before dredging. I learned this the hard way when my first batch came out undercooked in the middle despite baking time. Even thickness = even cooking.
- Chill the Batter: Mix your buttermilk, eggs, and baking powder, then refrigerate the batter for at least 30 minutes before dipping. Sounds counterintuitive, but it thickens the coating so it sticks better to the chicken. My grandmother swore by this, and she was right: the crust stays put instead of sliding off halfway through baking.
- Double-Bread the Chicken: Dip the chicken in buttermilk first, then flour, then buttermilk again—this time with a splash of hot sauce if you’re feeling bold. The second flour dip seals the deal. I was skeptical until I tried it: the crust turns crispy and golden, not dry or mealy.
- Rotate the Pan: Swap the baking sheet’s position halfway through cooking—front rack to back, or left to right. The oven’s hot spots will hit the chicken evenly, so no one piece gets overdone while others lag. This isn’t the prettiest method, but it’s the tastiest. Trust me, your waffles will thank you later.
Common mistakes when making this recipe
Overcrowding the Pan
I’ve seen so many home cooks make this mistake—packing too many chicken pieces onto the baking sheet. When you overcrowd, the pieces steam instead of crisp up properly, and the batter gets soggy. The key is spacing them about 1 inch apart in a single layer.
I like to arrange them in a grid pattern for even airflow. If you’re short on space, bake in batches rather than risking uneven cooking. 🌡️
Skipping the Resting Time
This is one of my biggest pet peeves in home cooking. The 10-minute rest for the battered chicken is absolutely critical—it lets the coating adhere properly and develop that perfect crispy texture. I’ve tested this countless times, and skipping it results in uneven coating and less crispiness.
Trust the process, even if it feels like extra time. The same goes for the waffle batter—those 10 minutes of resting make all the difference in texture.
Wrong Temperature Control
The oven temperature is non-negotiable for crispy results. I’ve seen people bake at 375°F thinking it’s safer, but that just gives you undercooked chicken with a soft coating. You need that 425°F heat to get the Maillard reaction going for that deep golden color and crispy texture.
And don’t open the oven door too often—every time you do, you lose heat and extend cooking time. I set a timer and only check once at the halfway point.
Using Cold Ingredients
Cold chicken pieces and cold batter are the enemies of crispy perfection. I always make sure my chicken is at room temperature before coating, and I take my eggs out of the fridge 30 minutes before starting.
Cold ingredients mean longer cooking times and less crispiness. The same goes for your waffle iron—make sure it’s properly preheated before adding batter. I like to run mine for 5-10 minutes before starting to ensure even cooking.
Not Flipping the Chicken
This is a common oversight that results in unevenly cooked chicken. You must flip the pieces at the 12-minute mark to ensure both sides get that perfect golden crust. I use a thin spatula to carefully turn each piece, being mindful not to break through the coating.
The first side should be nicely browned before flipping, and the second side should take about 8-10 minutes more to reach that crispy perfection. Skipping this step means you’ll have one side that’s overcooked and another that’s underdone.
Overmixing the Batter
Both the chicken and waffle batters need to be mixed just until combined—no more. Overmixing develops gluten in the flour, which makes the chicken coating tough and the waffles dense. For the chicken batter, mix until smooth but stop as soon as all ingredients are incorporated.
For the waffles, gently fold the wet ingredients into the dry just until no dry spots remain. I like to use a spatula and cut through the center to check for lumps rather than overworking the batter. 💡
Nutrition facts
Frequently asked questions
Can I use chicken thighs instead of breasts for this recipe?
Yes, but with adjustments! Chicken thighs are more forgiving and stay juicier, but they’ll need 5-7 extra minutes at 400°F to reach 165°F internally. For extra crispiness, pat them dry first and increase the flour in the batter by 2 tablespoons. The skin will render fat, so place thighs skin-side down on the baking sheet.
How do I make this dish ahead of time for a brunch?
Prepare the chicken batter and coat the pieces, then refrigerate for up to 24 hours. Bake fresh before serving, but you can reheat cooled chicken in a 375°F oven for 5 minutes to restore crispiness. Make waffles fresh—they lose structure when reheated. Assemble just before serving to keep everything crisp and warm.
What’s the best way to store leftovers?
Store chicken and waffles separately in airtight containers. Chicken keeps 3 days refrigerated or 3 months frozen (thaw overnight in fridge). Waffles are best eaten fresh but can be frozen for 1 month—reheat in a toaster or 350°F oven for 5 minutes. Never microwave waffles—they’ll turn rubbery!
Can I make this gluten-free?
Use a 1:1 gluten-free flour blend (like Bob’s Red Mill) for both batters. Add ½ teaspoon xanthan gum to the chicken batter for crispiness. For waffles, increase baking powder to 2½ teaspoons and let batter rest 15 minutes for better rise. Expect slightly denser results, but still delicious!
Why did my waffles turn out gummy?
This usually happens from overmixing or undercooking. Make sure to mix just until combined (no lumps, but no overworking either). Cook until golden brown with steam rising—waffles should be crisp enough to hold their shape. If your iron isn’t hot enough, increase heat slightly for the next batch. A 350°F iron works best for even cooking.