
I’ll be honest—beef bourguignon always intimidated me until I realized it’s just a fancy name for the most comforting beef stew you’ll ever make. The first time I served this at a dinner party in Charleston, my guests thought I’d spent all day slaving over it. Truth was, most of that time was hands-off braising while I sipped wine and chatted in the kitchen.
What makes this dish special isn’t complicated techniques—it’s about building layers of flavor. You start by searing beef until it develops a deep crust, then braise it slowly with red wine, mushrooms, and those little pearl onions that make everything feel fancy. The sauce reduces down to this rich, velvety consistency that coats every bite. I’ve made this with everything from expensive Bordeaux to decent table wine, and it always delivers.
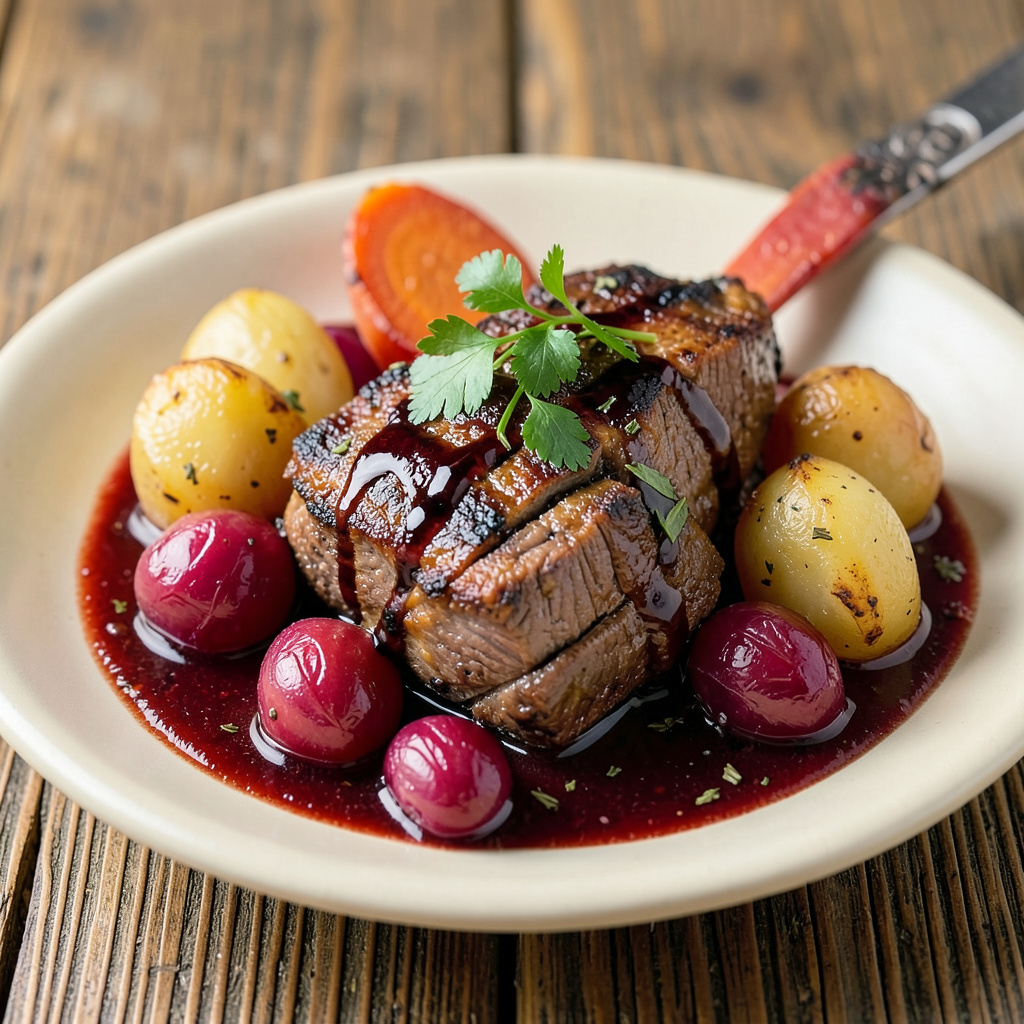
The real magic happens when you plate it. I like to mound the beef and vegetables slightly off-center on a wide, shallow bowl, then drizzle that glossy sauce around it like a moat. A sprinkle of fresh parsley and some crusty bread on the side turns it from homey stew to restaurant-worthy centerpiece. The contrast between the dark, rich beef and bright green garnish makes it look like you’ve been trained in a French kitchen.
Here’s the thing—this dish tastes even better the next day, so it’s perfect for making ahead. Whether you’re serving it to company or just treating yourself to a fancy weeknight dinner, the presentation is what takes it from good to unforgettable. Let me show you how to build those flavors and plate it like a pro.
📚 In This Guide
- What You’ll Need
- Instructions
- Tips and Common Mistakes
What Youll Need
- ● Serving dishes: 1-2 shallow, wide-rimmed white or neutral-colored plates (10-12″ diameter) per serving—oven-safe if warming 🍽️
- ○ Optional: Slate boards or rustic wooden platters for family-style serving
- ● Tools: 1 slotted spoon (for placing beef/veggies precisely)
- ● 1 small ladle (½-cup capacity for sauce control)
- ● 1 fine-mesh strainer (to skim sauce if needed)
- ● Tweezers (for garnish placement—pro move! ✨)
- ○ Kitchen torch (optional, for caramelizing onions or browning edges)
- ● Garnishes (pick 2-3): ½ cup fresh parsley leaves (rough-chopped)
- ● ¼ cup chives (cut into 1″ batons)
- ● 1 tbsp microgreens (for delicate texture)
- ● 4-6 pearl onions (blanched, peeled)
- ● 2 tbsp crispy fried shallots (store-bought ok!)
- ● Prerequisites: 1 batch fully cooked beef bourguignon (cooled slightly for easier plating)
- ● Sauce reduced to nappe consistency (coats the back of a spoon)
- ● Mashed potatoes or polenta (1 cup per plate, as base)
Instructions for Plating Beef Bourguignon
Transforming your rich, slow-cooked stew into a stunning presentation is simpler than you think.
Prepare Your Plating Surface
Start with warm plates—this keeps your dish hot longer and enhances the dining experience. I like to place dinner plates in a 200°F oven for 5 minutes while I finish the bourguignon. Choose white or light-colored plates to make the deep brown sauce and vibrant vegetables pop visually.
Wipe the plate edges clean with a damp cloth to remove any dust or fingerprints. A pristine canvas makes all the difference in presentation. Position the plate so the most visually appealing side faces your guest when served—this small detail shows thoughtfulness in your presentation.
Create a Starch Base for Structure
Begin by placing your starch component—whether it’s mashed potatoes, egg noodles, or crusty bread—on the plate first. For mashed potatoes, I use a large spoon to create a smooth mound slightly off-center. With noodles, twirl them into a nest shape using tongs and place them toward the back of the plate.
The starch serves as both a flavor base and visual anchor. Leave some negative space around it—this creates room for the beef and vegetables to shine. If using bread, toast it lightly and position it at an angle, allowing the sauce to cascade naturally over it when you add the stew components.
Arrange the Beef and Vegetables Strategically
Select the most attractive pieces of beef—those with good color and shape—and place them prominently on top of your starch base. I like to arrange 3-4 pieces per serving in a slight arc pattern, creating visual movement across the plate.
Next, scatter the vegetables around the beef. Place the pearl onions and mushrooms in small clusters rather than evenly distributed—they’ll look more natural and abundant. The carrots can add a pop of color, so position them where they’ll contrast beautifully against the dark sauce. Remember, odd numbers (3, 5, 7) create more appealing arrangements than even numbers.
Sauce with Precision and Artistry
Instead of drowning the plate in sauce, use it intentionally to enhance both flavor and appearance. I spoon just enough sauce around the base of the beef and vegetables to moisten them without covering their textures. Then, I drizzle additional sauce in a zigzag pattern across the plate using the back of a spoon.
The sauce should connect all elements visually while still allowing each component to shine. For extra polish, drag the tip of your spoon through the sauce to create decorative swirls or lines. This technique adds restaurant-quality flair with minimal effort. The sauce should glisten but not pool excessively on the plate.
Add Final Touches for Restaurant-Worthy Appeal
Finish with fresh herbs—parsley is classic, but thyme or chives work beautifully too. Sprinkle them lightly over the beef and around the plate for fresh color contrast. A light dusting of freshly cracked black pepper adds visual texture and hints at the dish’s rich flavors.
For the ultimate touch, place a small pile of flaky sea salt near the beef—guests can add it to taste, and it adds an elegant detail. Step back and view the plate from all angles before serving to ensure balance. The eye should move naturally from the starch base to the beef, then to the vegetables, and finally to the sauce elements tying everything together.
Tips and Common Mistakes for Plating Beef Bourguignon
Presentation makes all the difference between a home-cooked meal and a restaurant-worthy dish. Here’s what I’ve learned from plating thousands of dishes.
Plate Warming Technique: Those 5 minutes in a 200°F oven for your plates aren’t just about warmth—they prevent your carefully arranged components from cooling too quickly. I always warm my plates while finishing the sauce, and you’ll notice the difference in how long the dish stays hot during service. The gentle heat also helps the sauce maintain its ideal consistency when plated.
Starch Placement Strategy: When creating your base in Step 2, think about how the sauce will flow. For mashed potatoes, make a slight indentation in the center of your mound—this creates a natural well for sauce to pool. With noodles, arrange them so they fan out slightly toward the plate’s edge, guiding the eye outward. This small adjustment makes the final presentation look more intentional and balanced.
Sauce Application Secret: In Step 4, after drizzling your sauce, take a clean spoon and gently swipe it through the sauce pattern you’ve created. This “pull” technique—used in fine dining—creates elegant negative space and makes the dish look more refined. The key is to move quickly and confidently; overworking it can make the design look messy rather than artistic.
Final Touch Timing: Don’t add your fresh herbs and flaky salt until the very last moment before serving. I’ve seen many home cooks sprinkle herbs too early, only to have them wilt or get lost in the sauce during final transport to the table. Wait until the plate is completely arranged, then add these finishing elements—they should look as fresh when served as they did when plated.
Pro Tips for Plating Beef Bourguignon
- Presentation makes all the difference between a home-cooked meal and a restaurant-worthy dish. Here’s what I’ve learn…
- Plate Warming Technique: Those 5 minutes in a 200°F oven for your plates aren’t just about warmth—they prevent your c…
- Starch Placement Strategy: When creating your base in Step 2, think about how the sauce will flow. For mashed potatoe…
Frequently Asked Questions
Here are the most common questions about plating beef bourguignon—with quick, actionable answers to help you nail that perfect presentation!
How do I keep the beef from drying out while plating?
Pat the beef dry before searing, but avoid overcooking it initially. Plate it immediately after reheating (if needed) and drizzle with extra reduced wine sauce to lock in moisture. Pro tip: Use tongs—not a fork—to prevent piercing the meat and losing juices.
Can I prepare components ahead of time for easier plating?
Absolutely! Cook the beef, mushrooms, and pearl onions 1–2 days ahead and store separately. Reheat gently in the sauce before plating. Pre-cook bacon and potatoes (if using) the same day. Assemble just before serving for the freshest look.
What’s the best alternative to traditional mashed potatoes for plating?
Try these stylish swaps:
- Celeriac purée (creamy, earthy flavor)
- Polenta cakes (seared for texture)
- Buttered egg noodles (twirled into nests)
- Crushed root vegetables (parsnips + carrots for color)
How do I fix a sauce that’s too thin for plating?
Simmer uncovered for 5–10 minutes to reduce, or mix 1 tsp cornstarch with cold water and stir in. For a glossy finish, swirl in a pat of butter at the end. Avoid over-reducing—it should coat the back of a spoon but still drizzle smoothly.
What’s the ideal serving temperature for beef bourguignon when plating?
Aim for 160–165°F (71–74°C) for the beef and 140°F (60°C) for the sauce. Use a thermometer to check! Serve on warmed plates to prevent cooling too fast—chilled dishes make the sauce congeal.
Plating beef bourguignon like a pro is all about balancing rustic charm with elegant precision—and now you’ve got the tools to do it! From choosing the right dishware to mastering garnishes and sauces, every detail elevates this classic from hearty comfort food to a showstopping centerpiece. 🍷✨
Ready to impress? Grab your favorite red wine, set the table, and let your beautifully plated bourguignon take center stage. For extra flair, pair it with our wine guide or experiment with seasonal sides—your guests (or your Instagram feed!) won’t know what hit ‘em. 😉