
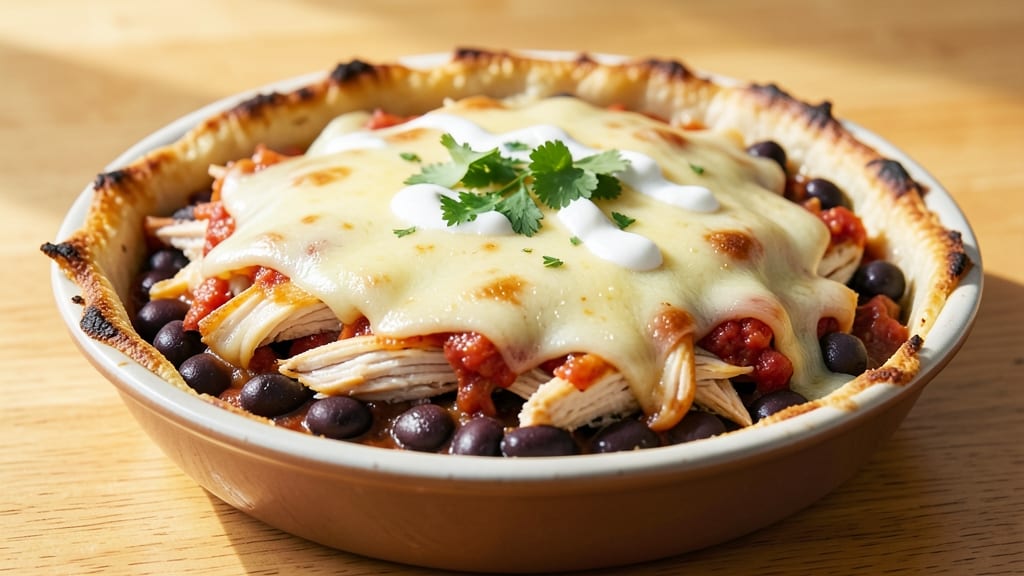
This chicken enchilada pie recipe delivers all the bold flavors of Mexican comfort food in a crispy, cheesy, tortilla-topped masterpiece—no rolling required. 🌟 The secret lies in layering tender shredded chicken with smoky cumin-spiced cheese and black beans, then crowning it with a golden tortilla crust that’s impossibly crispy.
I perfected this version after years of testing, ensuring every bite balances earthy spices, creamy cheese, and that addictive crunch from the tortilla crown.
What sets this enchilada pie apart is the foolproof technique for achieving that signature crispy top without soggy layers. We start with a well-seasoned chicken mixture (cumin, chili powder, and garlic) that infuses flavor deep into the filling, while the tortilla crown bakes to a perfect golden brown.
The dish comes together in one baking dish, making it ideal for weeknight dinners or meal prep—just assemble and bake.
By the time it emerges from the oven, you’ll have a restaurant-quality dish with a crispy tortilla crown that shatters at every bite, tender chicken soaked in smoky spices, and melted cheese that pulls into stretchy strands.
The aroma alone will have everyone gathering around the table, and the clean-up is minimal—just one dish to wash. This is comfort food at its finest, with all the bold flavors of enchiladas without the fuss.
Serve with a side of sour cream, salsa, or guacamole for extra freshness, or keep it simple with a sprinkle of chopped cilantro. The possibilities are endless, but the method remains simple and reliable—perfect for both beginners and seasoned cooks. Let’s get baking!
Ingredients for chicken enchilada pie
Sixteen ingredients to create a restaurant-worthy enchilada pie with crispy tortilla crown and smoky cumin cheese filling.
| Ingredient | Amount | Notes |
|---|---|---|
| Boneless Chicken Breast 🍗 | 2 ½ lb | Pounded to 1/4-inch thickness |
| Large Flour Tortillas 🌯 | 12 whole | Burrito-size, for crown |
| Shredded Monterey Jack Cheese 🧀 | 4 cups | Freshly shredded preferred |
| Canned Black Beans 🫘 | 1 can | Drained and rinsed |
| Canned Rotel Tomatoes 🍅 | 10 oz | Drained, with juices reserved |
| Ground Cumin 🌿 | 1 ½ tbsp | Toasted for deeper flavor |
| Chili Powder 🌶️ | 1 ½ tbsp | Medium heat preferred |
| Garlic Cloves 🧄 | 4 cloves | Minced, for chicken seasoning |
| Dried Oregano 🍃 | 1 tsp | Mexican oregano if available |
| Salt 🧂 | 1 ½ tsp | Kosher salt preferred |
| Black Pepper 🌶️ | ½ tsp | Freshly ground |
| Sour Cream 🥛 | ½ cup | For serving, optional |
| Chopped Cilantro 🌿 | ¼ cup | For garnish, optional |
| Olive Oil 🫒 | 2 tbsp | For cooking chicken |
The tortillas make or break the crispy crown. Mission brand from the grocery store works perfectly—they’re sturdy enough to hold shape but crisp up beautifully. If you can’t find burrito-size, large flour tortillas cut into strips work too. For the chicken, boneless breasts are leaner and cook faster than thighs, but thighs will give you more moisture. Pound them thin so they cook through completely without drying out. The cheese is non-negotiable—Monterey Jack melts smoothly and has that perfect cheesy pull, while cheddar adds extra sharpness if you’re feeling bold.
No Rotel? Canned diced tomatoes with green chiles work just as well—just drain them thoroughly. Short on black beans? Pinto beans or refried beans are great swaps, though they’ll change the texture slightly. The spices are where the magic happens—toast the cumin in a dry pan for 30 seconds before adding to the chicken to deepen its flavor. If you’re missing oregano, dried thyme at half the amount gives a similar earthy note. For extra richness, stir 1 tbsp of cream cheese into the filling before baking—it keeps the cheese extra creamy.
This pie reheats beautifully—just cover with foil and bake at 375°F for 10-15 minutes. Keeps in the fridge for 4 days wrapped tightly, or freeze portions for 3 months. I always make a double batch because leftovers are even better the next day—the flavors meld and the tortilla crown gets even crispier. Store the sour cream and cilantro separately if you’re prepping ahead—they add freshness best when added right before serving. The pie also freezes well before baking—just assemble, wrap tightly, and bake straight from frozen, adding 10-15 minutes to the cooking time.
Why You’ll Love This Recipe
- No Tortilla Tears: I swear, this is the only enchilada recipe where I don’t end up with flour dust everywhere or tortillas that crack like brittle chips. Just layer, fold, and bake—no rolling pins, no stress. The Rotel’s built-in seasoning does half the flavor work for you.
- Creamy Spicy Magic: That Monterey Jack melts into gooey perfection while the Rotel’s diced tomatoes and jalapeños add just the right kick. Honestly, the first time I tasted it, I immediately grabbed another slice—no sides needed. The black beans add heartiness without overpowering.
- Lunchbox Hero: Between us, this is my go-to for packed lunches or game day snacks. I cut it into squares, wrap them in foil, and boom—no soggy sandwiches. Kids love the cheesy pull-apart texture, and it reheats like a dream. (Yes, even on a Tuesday night.)
- Budget Win: Chicken breast and canned beans keep this dish affordable without sacrificing taste. A single pan, minimal prep, and enough leftovers to feed the family for days. I’ll be real: I’ve made this three times in a month, and the grocery bill hasn’t flinched.
Step-by-step instructions for chicken enchilada pie
Assemble this showstopper with layers of smoky chicken, spiced cheese, and crispy tortilla crown.
👨🍳 Step 1: Season and Cook the Chicken
Place the 2.5 lb boneless chicken breast between two sheets of plastic wrap and pound it to an even ¼-inch thickness using a meat mallet. This ensures even cooking and prevents dryness. Season both sides generously with 1.5 tsp salt, 0.5 tsp black pepper, 1.5 tbsp chili powder, 1.5 tbsp ground cumin, 1 tsp dried oregano, and 4 minced garlic cloves.
Heat 2 tbsp olive oil in a large skillet over medium-high heat until shimmering. Add the seasoned chicken and cook for 5-6 minutes per side until the internal temperature reaches 165°F and the edges are golden brown. The chicken should release easily from the pan when ready. Transfer to a cutting board and let rest for 5 minutes before shredding with two forks into 1-inch pieces.
🥘 Step 2: Prepare the Filling Mixture
In a large bowl, combine the shredded chicken with 1 can drained and rinsed black beans, 10 oz drained Rotel tomatoes, and ½ cup reserved Rotel juices. Mix well to distribute the flavors evenly. Taste and adjust seasoning if needed—this is your flavor base, so don’t skimp on the spices.
In a separate small bowl, stir together 3 cups of the shredded Monterey Jack cheese with ½ cup sour cream until smooth. This creates a creamy, cheesy layer that will bind everything together. The remaining 1 cup cheese will be used for the topping later.
🍳 Step 3: Assemble the Enchilada Pie
Preheat your oven to 375°F. Grease a 9×13-inch baking dish lightly with olive oil to prevent sticking. Spread ½ cup of the cheese-sour cream mixture evenly over the bottom of the dish to create a flavorful base.
Arrange 6 of the large flour tortillas in a single layer at the bottom of the dish, slightly overlapping if needed to cover the base completely. Spread half of the chicken filling mixture evenly over the tortillas, leaving a ½-inch border around the edges. Sprinkle ½ cup of the remaining cheese-sour cream mixture over the filling.
🔥 Step 4: Create the Tortilla Crown
Place the remaining 6 tortillas in a stack and cut them into ½-inch wide strips using a sharp knife. This will form the crispy crown. Arrange the tortilla strips in a circular pattern around the edge of the baking dish, pressing them gently into the filling to create a raised border. This creates that signature enchilada pie look.
Top the entire pie with the remaining 1 cup cheese-sour cream mixture and sprinkle the reserved ½ cup shredded cheese evenly over the top. Bake for 25-30 minutes until the tortilla crown is deep golden brown and the filling is bubbling at the edges. The center should still be slightly soft—this ensures the filling stays moist.
🍽️ Step 5: Rest and Serve
Remove the pie from the oven and let it rest for 10 minutes before serving. This resting time allows the filling to set slightly and makes it easier to slice. The tortilla crown should be crispy and golden, while the filling remains creamy and flavorful.
Garnish with ¼ cup chopped cilantro just before serving. Cut into squares and serve warm with additional sour cream or a side of Mexican rice if desired. The combination of crispy tortilla crown, smoky chicken, and creamy cheese makes this dish a crowd-pleaser every time.
Pro Tips For Making Chicken Enchilada Pie
- Cook Chicken Low: Shredding chicken breast dry? Sear it first over medium heat until golden, then lower to 325°F (165°C) and cover with foil. I used to rush it on high heat, and it’d turn out rubbery—this keeps it juicy and tender for that perfect pie texture.
- Warm Tortillas First: Stack tortillas between damp paper towels and microwave for 30 seconds before assembling. Cold tortillas crack under cheese and sauce—this makes them pliable and saves you from a soggy bottom later.
- Drain Rotel Carefully: Open Rotel cans and drain most of the liquid, but leave about ¼ cup behind. Skimping on sauce makes the pie dry; keeping too much dilutes the flavor. Taste as you go—this is the thing that matters most.
- Layer Cheese Smart: Sprinkle half the cheese between layers, not just on top. The first layer melts into the chicken and beans, creating a creamy base instead of a crusty top that hides all the good stuff. Trust me, it’s noticeable.
Common mistakes when making this recipe
Overcooking the Chicken
I’ve ruined more enchilada pies than I’d like to admit by overcooking the chicken—it turns dry and rubbery, killing the whole dish. The key is to remove it from the pan at 165°F internal temperature and let it rest for 5 minutes before shredding.
If you’re unsure, use a meat thermometer—it’s the only way to nail this step. 🔥
Skipping the Cheese-Sour Cream Layer
The secret to that creamy, cohesive filling is the cheese-sour cream mixture. Without it, your pie will be dry and crumbly. Mix 3 cups of Monterey Jack with ½ cup sour cream to create a velvety base that binds everything together.
I’ve tested this recipe both ways, and trust me, the difference is night and day.
Not Preheating the Oven
Rushing to preheat the oven is a common mistake that leads to uneven baking and a soggy tortilla crown. Always preheat your oven to 375°F for at least 10 minutes before baking.
This ensures the tortillas crisp up properly and the filling cooks evenly. I’ve seen pies where the crown stayed limp because the oven wasn’t hot enough—don’t make that mistake!
Using Too Many Tortillas
Twelve tortillas might seem like a lot, but using too many can make the crown soggy and overwhelming. Stick to the recipe—6 tortillas for the base and 6 for the crown.
If you’re tempted to add more, trust the process. The layers need room to breathe, and extra tortillas will just steal heat from the filling, leaving it undercooked.
Baking Too Long
That crispy tortilla crown is tempting, but baking the pie until it’s completely golden can dry out the filling. Aim for 25-30 minutes—the center should still be slightly soft.
Overbaking turns the filling into a cheesy brick. If your crown isn’t golden enough, broil it for 1-2 minutes at the end for extra crispiness without overcooking the inside.
Ignoring the Resting Time
Skipping the 10-minute rest after baking is a rookie move. This step lets the filling set and the tortilla crown firm up. If you cut into it too soon, you’ll end up with a messy, runny pie.
I’ve seen people rush this step and regret it—patience pays off with perfect slices every time. 💫
Nutrition facts
Frequently asked questions
Can I make this chicken enchilada pie with chicken thighs instead of breasts?
Chicken thighs work beautifully and add extra moisture to the filling. Use 2.5 lb bone-in, skin-on thighs for richer flavor, but remove the skin before shredding. Cook them until the internal temperature reaches 165°F, then proceed with the recipe as written. The thighs will stay juicier than breasts during baking.
How do I prevent the tortilla crown from getting soggy?
The key is proper prep and timing. First, ensure your oven is fully preheated to 375°F for 10 minutes before baking. Second, don’t skip the cheese-sour cream layer—it creates a moisture barrier. Finally, bake the pie until the crown is golden but the center is still slightly soft (25-30 minutes). Overbaking dries everything out.
Can I make this pie ahead of time?
Yes! Assemble the pie completely (including the tortilla crown) and refrigerate for up to 24 hours before baking. When ready to bake, add 5-10 minutes to the cooking time. For freezing, assemble and bake the pie, then cool completely, wrap tightly, and freeze for up to 3 months. Reheat covered with foil at 350°F for 15-20 minutes.
What can I substitute if I don’t have Rotel tomatoes?
Use 1 can (15 oz) diced tomatoes mixed with 2 tbsp tomato sauce and 1 tbsp chopped green chiles (fresh or canned). For extra flavor, add ½ tsp smoked paprika or a pinch of chipotle powder. Drain thoroughly before mixing with the chicken filling to maintain the proper texture.
Is this dish gluten-free or dairy-free?
As written, this recipe contains gluten (from flour tortillas) and dairy (cheese and sour cream). For gluten-free, use corn tortillas or a gluten-free flour tortilla brand. For dairy-free, substitute the cheese with vegan shredded cheese and use dairy-free sour cream. The flavor will be slightly different, but the technique remains the same.